blogger templates blogger widgets
Showing posts with label linux tutorials. Show all posts
This is part of a list of blog posts.
To browse the contents go to

sudo Basics

Install sudo (substitute user do)

If you have used Ubuntu, you might be familiar with sudo. It allows users to run programs with privileges of another user (normally a superuser).
Using sudo, a user needn't login as a root. He can rent that privilege using the sudo command to perform privileged tasks.
To install sudo in ArchLinux:
#pacman -Syu sudo
Use appropriate package manager depending upon your distribution. In Archlinux, pacman is the default package manager.

Now I needn't use the system as root. So I create a account for myself.

Add a new user account

To create a new user account use adduser program:

Options:
-d home directory
-s starting program (shell)
-p password
-g (primary group assigned to the users)
-G (Other groups the user belongs to)
-m (Create the user's home directory
[root@myhost ~]# useradd -d/home/onie -m onie

Modify or add password
To add a password to a user account use passwd command.
[root@myhost ~]# passwd onie
Enter new UNIX password:
Retype new UNIX password:
passwd: password updated successfully

Switch to another user account

To switch to another user, we use the su command. This is most commonly used to switch to the root account.

Example: To switch to root account
su
(When asked for password enter root's password)

Example: To switch to the user 'onie'
su onie
(Enter onie's password)
To return to original user, enter exit

Modifying existing user accounts

To modify a user account we use usermod command.
Options:
-d home directory
-s starting program (shell)
-p password
-g (primary group assigned to the users)
-G (Other groups the user belongs to)

Deleting a user account

To delete user account we use userdel command.
Options:
-r (remove home directory)

To know more about group/user creation and modification: User and Groups Tutorial

To continue to SUDO configuration : SUDO tutorial
Sudo article from Archwiki pages: Sudo

sudo Tutorial

If you are using Ubuntu, you will already have sudo installed. But if you are on other linux distros like ArchLinux, you need to install it by yourself.

After installing, you need to create a account for yourself. Read about creating, modifying and switching accounts here

Configure sudo

Sudo's configuration file is /etc/sudoers. You can edit it using vi but it's advised to edit it using the visudo command.
#visudo


visudo command opens your sudoers file using nano editor. You can change that to your preferred editor (I prefer vim) in 3 ways
  1. Just for once.
    If you want to use another editor only this time, Run
    #EDITOR=vim visudo

  2. At all times
    If you want sudoers file to be opened in editor of your choice at all times, then
    #EDITOR=vim visudo

    Append this line to the top of the file.
    Defaults editor=/usr/bin/vim

  3. System-wide setting
    To set your preferred editor as the default editor for your whole system, add the below line to ~/.bashrc file.
    export EDITOR=vim

Note: Whatever be the case, we still should open the file using visudo command.


Why do you need to use visudo and not vi sudo?
visudo locks the sudoers file, saves edits to a temporary file, and checks that file's grammar before copying it to /etc/sudoers. It is imperative that sudoers be free of syntax errors since it will not run otherwise.

To give a user or group root privileges add this line.
USER_NAME ALL=(ALL)ALL

So I added the below line to the sudoers file.
onie ALL=(ALL)ALL NOPASSWD: ALL

NOPASSWD: ALL removes the password requirement everytime you sudo.


What does "ALL" mean here?
It's a built in aliases. It could be used in place of any other alias.


What happens when a user who is not listed in sudoers file tries to run sudo?
A mail get sent. To whom? Well, mostly to system administrators. But it's configurable via "default entries".


How does a user try out sudo without sending a mail?
use -l or -v option.
[onie@myhost root]$ sudo -v
Password:
[onie@myhost root]$ sudo -l
User onie may run the following commands on this host:
(ALL) ALL

This allows users to check for themselves whether or not they are allowed to use sudo.


How long does the sudo effect last?>
Once a user uses sudo, the sudo privilege lasts for 5 minutes (default). That means you can run other admin commands without entering password each time. This can be modified using "Default entries".


What does "Defaults env_reset" mean?
It resets the terminal environment after switching to root. So, all user set variables gets removed. There are a lot other "Default entries".

Default entries

Certain configuration options may be changed from their default values at runtime via one or more Default Entry lines. These may affect all users on any host, all users on a specific host, a specific user, a specific command, or commands being run as a specific user.
Few of the common overrides are:
  • env_reset
    If set, sudo will reset the environment to only contain the LOGNAME, MAIL, SHELL, USER, USERNAME and the SUDO_ variables.
  • mail_always
    Send mail to the mailto user every time a users runs sudo. This flag is off by default.
  • mail_badpass
    Send mail to the mailto user if the user running sudo does not enter the correct password. This flag is off by default.
  • mail_no_user
    If set, mail will be sent to the mailto user if the invoking user is not in the sudoers file. This flag is on by default.
  • rootpw
    If set, sudo will prompt for the root password instead of the password of the invoking user. This flag is off by default.
  • passwd_timeout
    Number of minutes before the sudo password prompt times out. Use 0 for no timeout. The default is 5.
  • timestamp_timeout
    timestamp_timeout
    Number of minutes that can elapse before sudo will ask for a passwd again. The default is 5. Set this to 0 to always prompt for a password. If set to a value less than 0 the user's timestamp will never expire.
For a detailed look at these, check out the Sudoers Manual
Also there is a sample sudoers file available: sample.sudoers


A Detailed look at Sudoers file

The sudoers file is composed of two types of entries:
  • aliases (basically variables)
  • user specifications (which specify who may run what)


Aliases

There are 4 kinds of aliases.
User_Alias, Runas_Alias, Host_Alias and Cmnd_Alias.
Each alias definition is of the form:
Alias_Type NAME = item1, item2, ...
where

Alias_Type is one of User_Alias, Runas_Alias, Host_Alias or Cmnd_Alias.
a name is the alias name (it could be a string of uppercase letters, numbers and underscores).
item1, item2,.. are values. And these depend on the type of alias you are dealing with.
You can put several aliases of the same type on one line by separating them with colons (:) as so:
Alias_Type NAME1 = item1, item2 : NAME2 = item3


The text that follow are taken from the Ubuntu documentation pages.

User Aliases

User aliases are used to specify groups of users. You can specify usernames, system groups (prefixed by a %) and netgroups (prefixed by a +) as follows:
# Everybody in the system group "admin" is covered by the alias ADMINS
User_Alias ADMINS = %admin
# The users "tom", "dick", and "harry" are covered by the USERS alias
User_Alias USERS = tom, dick, harry
# The users "tom" and "mary" are in the WEBMASTERS alias
User_Alias WEBMASTERS = tom, mary
# You can also use ! to exclude users from an alias
# This matches anybody in the USERS alias who isn't in WEBMASTERS or ADMINS aliases
User_Alias LIMITED_USERS = USERS, !WEBMASTERS, !ADMINS


Runas Aliases

Runas Aliases are almost the same as user aliases but you are allowed to specify users by uid's. This is helpful as usernames and groups are matched as strings so two users with the same uid but different usernames will not be matched by entering a single username but can be matched with a uid. For example:
# UID 0 is normally used for root
# Note the hash (#) on the following line indicates a uid, not a comment.
Runas_Alias ROOT = #0
# This is for all the admin users similar to the User_Alias of ADMINS set earlier
# with the addition of "root"
Runas_Alias ADMINS = %admin, root


Host Aliases

A host alias is a list of hostname, ip addresses, networks and netgroups (prefixed with a +). If you do not specify a netmask with a network the netmask of the hosts ethernet interface(s) will be used when matching.
# This is all the servers
Host_Alias SERVERS = 192.168.0.1, 192.168.0.2, server1
# This is the whole network
Host_Alias NETWORK = 192.168.0.0/255.255.255.0
# And this is every machine in the network that is not a server
Host_Alias WORKSTATIONS = NETWORK, !SERVER
# This could have been done in one step with
# Host_Alias WORKSTATIONS = 192.168.0.0/255.255.255.0, !SERVERS
# but I think this method is clearer.


Command Aliases

Command aliases are lists of commands and directories. You can use this to specify a group of commands. If you specify a directory it will include any file within that directory but not in any subdirectories.

The special command '"sudoedit"' allows users to run sudo with the -e flag or as the command sudoedit. If you include command line arguments in a command in an alias these must exactly match what the user enters on the command line. If you include any of the following they will need to be escaped with a backslash (\): ",", "\", ":", "=".
Examples:
# All the shutdown commands
Cmnd_Alias SHUTDOWN_CMDS = /sbin/shutdown, /sbin/reboot, /sbin/halt
# Printing commands
Cmnd_Alias PRINTING_CMDS = /usr/sbin/lpc, /usr/sbin/lprm
# Admin commands
Cmnd_Alias ADMIN_CMDS = /usr/sbin/passwd, /usr/sbin/useradd, /usr/sbin/userdel, /usr/sbin/usermod, /usr/sbin/visudo
# Web commands
Cmnd_Alias WEB_CMDS = /etc/init.d/apache2


User Specifications

User Specifications are where the sudoers file sets who can run what as who. It is the key part of the file and all the aliases have just been set up for this very point.

A user specification is in the format

<user list> <host list> = <operator list> <tag list> <command list>

user list - could be a user name or user alias for whom a security restriction/privilege is going to be set.
host list - is a list of hosts/machines or a host alias on which the security restriction/privilege are going to be set.
operator list - is a list of users they must be running as or a runas alias.
command list - is a list of commands or a cmnd alias, they are permitted to operate.
tag list - allows you set special flags for each command. There are 2 common flags used.
PASSWD and NOPASSWD - to specify whether the user has to enter a password or not.
NOEXEC - to prevent any programs launching shells themselves.

For example (using the aliases and users from earlier)
# This lets the webmasters run all the web commands on the machine
# "webserver" provided they give a password
WEBMASTERS webserver= WEB_CMDS
# This lets the admins run all the admin commands on the servers
ADMINS SERVERS= ADMIN_CMDS
# This lets all the USERS run admin commands on the workstations provided
# they give the root password or and admin password (using "sudo -u ")
USERS WORKSTATIONS=(ADMINS) ADMIN_CMDS
# This lets "harry" shutdown his own machine without a password
harry harrys-machine= NOPASSWD: SHUTDOWN_CMDS
# And this lets everybody print without requiring a password
ALL ALL=(ALL) NOPASSWD: PRINTING_CMDS


There is a sample sudoers file available: sample.sudoers
Users and Groups

useradd [options] username

The useradd command will update system files (/etc/passwd and /etc/shadow file with password) and may also create the new user's home directory and copy initial files.
Options:
- e {yyyy-mm-dd}
option to set account disable date.
- f {days}
option to set default password expiry.
If 0 is specified, the account is disabled immediately after the password expires. If -1 is specified, the account is not be disabled after the password expires.
- s {shell's absolute path location}
option to associate a starting shell program.
- p xxxxxx
option to speficy the password in the same line.
- m
option to create the user's home directory.
Example:
To add a new user with starting shell as /bin/bash,password of xxxx, home directory of eipe, create home directory (if it doesn't exists) and a login name of tom.
$ sudo useradd -pthomas -d/home/tom -m tom

The default values for useradd command are specified in /etc/default/useradd.


su - Switch User

To switch to another user, we use the su command. This is most commonly used to switch to the root account.
Example: To switch to root account
$su
(When asked for password, enter root's password)
Example: To switch to the user 'john'
$su john
(Enter john's password)
To return to original user, enter exit.

If you are not specifying password at the time of creation (when running useradd -p password), it disables the password on that account. The only way to login into the account is by su-ing from root.
A regular user can log into that account only after the root has set the password for that account.
Preferred method to create/manage users in Ubuntu is the Users & Groups utility in System > Administration.


groupadd newgroupname

The groupadd command is used to create a new group. Every user is a member of a primary group and may or may not be members of many secondary groups.


id

It prints the real and effective user ids and the groups and it's ids.
onie@onie-system:~$ id
uid=1000(onie) gid=1000(onie) groups=1000(onie),4(adm),20(dialout),24(cdrom),46(plugdev),111(lpadmin),119(admin),122(sambashare)
The first group is the primary group and it has the same name as my user id. We can change group names using groupmod command. (it's explained below).


userdel username

It's used to delete a user.
-r
option to remove his home directory.


groupdel groupname

It's used to delete a group.


passwd

It's used to change the user's password.
A username needs to be specified to change it for another user. (only allowed by root).


Where are user account information stored?

User names and primary groups are stored in /etc/passwd. This file can be directly edited using the 'vi' editor, although this is not recommended.
Sample entry from my passwd file is
onie:x:1000:1000:John Eipe,,,:/home/onie:/bin/bash

Format of each entry is as follows:
- User (name normally all lower case)
- Password (encrypted - only contains the letter 'x')
- User ID (a unique number of each user)
- Primary Group ID
- Comment (Normally the person's full name)
- Home directory (normally /home/
- Default shell (normally /bin/bash)
Each field is separated by a colon.


So where are passwords stored?

Passwords for each user are stored in /etc/shadow. This file should only be changed using the passwd command.


Where are group information stored?

Groups information is stored in /etc/group.
This file can be directly edited using the 'vi' editor. A Sample entry from my group file is
egroup:x:1000:

Format of each entry is:
- Group name
- Group password (hardly ever used)
- Group ID
- User names (separated by commas)
Each field is separated by a colon.


What is the default configuration for a new user account if it's not specified by the creator?

Say, the root creates a new user with no options.
#useradd tom

So, is the password set? Home directory created?
Well, it depends on your default configuration for useradd program which is stored in /etc/default/useradd.


How to customize the default files/directories that are created for every account?

When a new user is created, the default files and directories that are created are stored in /etc/skel.
This directory can be modified to fit your needs. Modifications only effect new users and does not change anything for existing users.
For example: In ubuntu (10.10) when a new user is created. We find the below files created automatically.
eipe@eipe-system:/etc/skel$ ls -a
. .. .bash_logout .bashrc examples.desktop .profile

But when we use GUI (nautilus) we don't see this, instead only a folder “Examples” with another folder “Ubuntu_Free_culture_showcase” in it.

Now let's try to read examples.desktop.

riya@eipe-system:~$ cat examples.desktop
[Desktop Entry]
Version=1.0
Type=Link
Name=Examples
Comment=Example content for Ubuntu
URL=file:///usr/share/example-content/
Icon=folder
X-Ubuntu-Gettext-Domain=example-content

we find that it's neither a hard-link nor a soft link but a special type of file used by the desktop environment programs like GNOME/KDE called “desktop entries”.

A desktop entry file is a configuration file that provides information about how a particular program is to be launched, how it appears in menus, etc. The desktop entry file specifies the details for the item such as a name, a command to run, an icon, and so on. It also contains keywords which determine the location of the item in the menu hierarchy.

Desktop entry files must reside in the $XDG_DATA_DIRS/applications directory and must have a .desktop file extension. If $XDG_DATA_DIRS1 is not set, then the default path is /usr/share is used.

To read more about creating/modifying desktop entries: Desktop Entry Specification


usermod -l new old

It's used to change user names.
It's not very simple to change user names. The root or the sudo user who is changing the user name needs to manually rename the old user's home folder. Change ownership of that data. Also add the user to sudoers list, and so on.


usermod -a -G groupname username#1.....

to add users to a group.


groupmod

to make modificatons to a group.
groupmod -n new_group_name old_group_name
is used to rename a group name.
I changed my group name onie to egroup.
$ sudo groupmod -n egroup onie
$ id
uid=1000(onie) gid=1000(egroup) groups=1000(egroup),4(adm),20(dialout),24(cdrom),46(plugdev),111(lpadmin),119(admin),122(sambashare)

In Debian systems, there is a much more interactive way of creating user and group accounts – adduser and addgroup programs.


adduser and addgroup

Adds users and groups to the system according to
command line options and configuration information in
/etc/adduser.conf. Use man pages to more info.

Hard links and Soft links in Linux

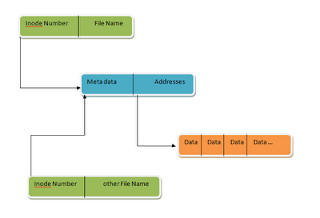
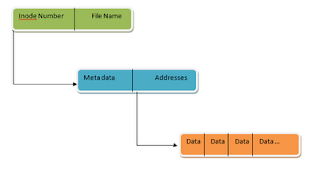
As we saw earlier, Unix files consist of two parts: the data part and the filename part.

The data part is associated with something called an 'inode'. Inode is like an index number that helps is to find where the data is, the file permissions, etc. for the data.
concept of inode in file system

All Unix variants include at least the following attributes, which are specified in the POSIX standard.
  1. File type
  2. Number of hard links associated with the file
  3. File length in bytes
  4. Device ID (i.e., an identifier of the device containing the file)
  5. Inode number that identifies the file within the filesystem
  6. UID of the file owner
  7. User group ID of the file
  8. Timestamps that specify the inode status change time, the last access time, and the last modify time
  9. Access rights (r,w,x values for user, group and others)
  10. File mode (sticky, setuserid, setgroupid)

Hard Links: When more than one file references the same inode entry.
hard links in file system

Soft Links: When the file's data part contains a link/path to another file. The OS recognizes this as a special file and so redirects all open/read/writes to the other file.
soft links in file system

ln command
There are 3 common forms in which ln is used.
$ ln target link_name :create link to target with the link name “link_name” in current directory.
$ ln target :create link to target with the same link name.
$ ln target directory :create link to target (link name same) in the specified directory.

eipe@eipe-system:~$ cat>a
this is a file
eipe@eipe-system:~$ cat a
this is a file
eipe@eipe-system:~$ cd temp
eipe@eipe-system:~/temp$ ln ../a alink
eipe@eipe-system:~/temp$ ls
alink
eipe@eipe-system:~/temp$ cat alink
this is a file


note that the link will be displayed like a normal file. No details that the file is a link is given to the external user.

Hard links have two limitations:
  • It is not possible to create hard links for directories. (to avoid cycles)
  • Links can be created only among files included in the same filesystem
Soft links (Symbolic links) are short files that contain a pathname of another file. The pathname may refer to any file or directory located in any filesystem; it may even refer to a nonexistent file.
The unix command is the same but with -s option.

Example:

eipe@eipe-system:~$ cat>t
thisisafile
eipe@eipe-system:~$ cd temp
eipe@eipe-system:~/temp$ ln ../t thlink
eipe@eipe-system:~/temp$ ls
thlink
eipe@eipe-system:~/temp$ ln -s ../t tslink
eipe@eipe-system:~/temp$ ls
thlink tslink

eipe@eipe-system:~/temp$ ls -la
total 12
drwxr-xr-x 2 eipe eipe 4096 2010-12-03 20:09 .
drwxr-xr-x 48 eipe eipe 4096 2010-12-03 19:38 ..
-rw-r--r-- 2 eipe eipe 6 2010-12-03 14:39 thlink
lrwxrwxrwx 1 eipe eipe 4 2010-12-03 20:09 tslink -> ../t

Note that for soft(symbolic) links the number is 1 but we get a description. Also for '..' the number is 48 meaning there are 48 directories under the parent directory.
How do we know that 2 files are the same (one being a hard link of another)?
Using -i option to print inode numbers

eipe@eipe-system:~$ ls -i -l -a
1055026 -rw-r--r-- 3 eipe eipe 0 2010-12-03 20:14 t
1055062 drwxr-xr-x 2 eipe eipe 4096 2010-12-03 20:09 temp
1704500 drwxr-xr-x 2 eipe eipe 4096 2010-11-24 11:13 Templates
1708831 drwxr-xr-x 2 eipe eipe 4096 2010-11-24 23:49 .themes
1055026 -rw-r--r-- 3 eipe eipe 0 2010-12-03 20:14 thlink


Creating Symlinks the Easy way
The file managers in both GNOME and KDE provide an easy method of creating symbolic links.
  • With GNOME, holding the Ctrl+Shift keys while dragging a file will create a link rather than copying (or moving) the file.
  • With KDE, a small menu appears whenever a file is dropped, offering a choice of
    copying, moving, or linking the file.

Shell commandS

Only the few of the most important commands are discussed here.

cd : to change directory.

cd ..
will go one step above.
cd ./temp
is same as cd temp.
cd –
will take you to the previous directory which you used.
cd ~
will take to home directory.
cd /
will take to root directory.


eipe@eipe-system://usr/lib$ cd ~
eipe@eipe-system:~$ cd -
//usr/lib
eipe@eipe-system://usr/lib$


mkdir : to create directory.

mkdir dir1 dir2
will create 2 directories dir1 and dir2 in the current directory.

cp : copy command

cp file1 file2
Copy file1 to file2. If file2 exists, it is overwritten with the contents of file1. If file2 does not exist, it is created. In either case, both files exists.

cp /vol/examples/tutorial/science.txt .
common options are:
-r : to recursively copy directories and their contents. This option (or the -a option) is required when copying directories.
-a : Copy the files and directories and all of their attributes, including ownerships and permissions. Normally, copies take on the default attributes of the user performing the copy.
-i : if file2 exists, the user is prompted before it is overwritten.

cp file1 file2 file3 dir1
Copy file1, file2, file3 into directory dir1. dir1 must already exist.
cp dir1/* dir2
All the files in dir1 are copied into dir2. dir2 must already exist.

mv : move command

mv file1 file2
Move file1 to file2. If file2 exists, it is overwritten with the contents of file1. If file2 does not exist, it
is created. In either case, file1 ceases to exist.

mv file1 file2 dir1
Move file1 and file2 into directory dir1. dir1 must already exist.

rm : to remove files or directories.

rm file1
Delete file1 silently.
rm -i file1
Same as above, except that the user is prompted for confirmation before the deletion is performed.
rm -r file1 dir1
Delete file1 and dir1 and its contents.
rm -f file1
-f option is used to force delete. It means that if the file does exist it will be deleted else if it doesn't no error message is printed simillar to
rm: cannot remove `': No such file or directory
-f option to suppresses these messages. It's useful when u write scripts to delete files silently and automatically at a specific time.

Note:
-v option is used with most of the commands (rm, cp...) it prints a msg about what it had performed.

login
To login as root/super user

sudo su
To login as any other user

login

Modes and Permissions - setUID and setGID

setUID and setGID bit values make sense only on executable files. It servers no purpose on normal text files.

setUID
If setuid bit is set on a (executable) file it causes the program to run as it's owner, no matter who executes it.
  • Octal value is 4.
  • Symbolic notation is u+s.

setGID
If setgid bit is set on a (executable) file, it causes the program to run as a member of the group that owns it, no matter who executes it.
  • Octal value is 2.
  • Symbolic notation is g+s.

Note:
To set setuid/setgid bit that program must be group-executable or other-executable.
The Linux kernel ignores the setuid and setgid bits on shell scripts. These bits work only on binary (compiled) executables.

Both the above points are very important.
The first one is a requirement for setuid/gid to work. As a matter of fact, setting the setuid/gid are privilege modifications beneficial to anyone other than the owner of the file. The second point means that if a user tries to set it on a regular file or a script (exception are perl scrips), it sets the bit without showing any error message.
  • A uppercase S denotes that the directory is not executable and has the setuid bit set.
  • A lowercase s denotes that the directory is executable and has the setuid bit set.


eipe@eipe-system:~/share$ ls -l
total 12
-rwxr-xr-- 1 eipe dev 7 2010-12-12 16:39 lister.sh
-rwxr-sr-- 1 eipe egroup 3 2010-12-16 20:34 list.sh
-rwSrwSr-- 1 eipe egroup 22 2010-12-15 00:05 rfile


list.sh is a shell script which is group-executable and uid bit is also set.
But still when tom tries,

tom@eipe-system:/home/eipe/share$ ./list.sh
bash: ./list.sh: Permission denied


rfile is a text file (which is of course not executable) and it's uid bit is set.

tom@eipe-system:/home/eipe/share$ cat>>rfile
bash: rfile: Permission denied

To understand more about permissions let's look at the concept of user and group. A user or group ID represents the permission level. We could view it from 3 angles.
  1. Perception of the user: The user who has logged into the system. The id of this user is called the real user ID and his primary group is called real group ID.
  2. Perception of the file: A file created by any user associates permissions to it by assigning the permissions for owner (himself), group and others.
  3. Perception of the process: A process which is running has permissions attached to it just like in the case of a file. Commonly known as the effective user ID. Normally, when a user executes a file, the process which results in this execution has the same permissions as those of the user.


When a user executes a file, the process which results in the execution of the file gets the same permissions as those of the user. Within a system, it's the permission level on the process (effective user ID) that matters. Because that determines what the process is capable of doing.
Check out the tmp directory and the passwd and shadow file.

eipe@eipe-system:/$ ls -ld tmp
drwxrwxrwt 16 root root 4096 2010-12-21 22:52 tmp
eipe@eipe-system:/$ ls -l etc/passwd
-rw-r--r-- 1 root root 1734 2010-12-16 20:14 etc/passwd
eipe@eipe-system:/$ ls -l etc/shadow
-rw-r----- 1 root shadow 1379 2010-12-16 20:15 etc/shadow

The listing shows that passwd is readable by all, but shadow is unreadable by group and others.
Now how is that a user (other than the root) is able to change his password and other account information without having group/other write permission on both the passwd and shadow file.

Well, this is how Unix solves the problem.

eipe@eipe-system:/$ ls -l /usr/bin/passwd
-rwsr-xr-x 1 root root 37100 2010-09-03 15:58 /usr/bin/passwd

This is another passwd file that helps out other users. You can notice a 's' there. This represents the mode set-user-id (SUID). This let's the process have the privileges of the owner/creator (rather than the current user) during the instance of the program.

Thus when a non privileged user executes passwd, the effective UID of the process is not the user’s, but of root’s – the owner of the program. This SUID privilege is then used by passwd program to edit /etc/shadow.

Let's create a executable file that prints something useful. :-)

eipe@eipe-system:~$ cat /etc/passwd
eipe: x:1000:1000:Eipe,,,:/home/eipe:/bin/bash
tom: x:1001:1001:Tom,,,,:/home/tom:/bin/bash

Write the below c program and save it as printid.c
#include<sys/types.h> 
#include<unistd.h> 
#include<stdio.h> 

int main(void) 
{ 
    printf( 
        "Real       UID = %d\n" 
        "Effective UID = %d\n" 
        "Real      GID = %d\n" 
        "Effective GID = %d\n", 
        getuid(), 
        geteuid(), 
        getgid(), 
        getegid() 
    ); 
    return 0; 
}

eipe@eipe-system:~$ ls -l | grep printid
-rwxr-xr-x 1 eipe egroup 252 2010-12-22 15:45 printid.c
eipe@eipe-system:~$ gcc -o printid printid.c

eipe@eipe-system:~$ ls -l | grep printid
-rwxr-xr-x 1 eipe egroup 7249 2010-12-22 16:24 printid
-rwxr-xr-x 1 eipe egroup 252 2010-12-22 15:45 printid.c
eipe@eipe-system:~$ ./printid
Real UID = 1000
Effective UID = 1000
Real GID = 1000
Effective GID = 1000


Now tom logs in. (Better if done on another shell window)


eipe@eipe-system:~$ su tom
Password:
tom@eipe-system:/home/eipe$ cd /home/eipe
tom@eipe-system:/home/eipe$ ./printid
Real UID = 1001
Effective UID = 1001
Real GID = 1001
Effective GID = 1001


Now we set the suid bit on the file.


eipe@eipe-system:~$ chmod u+s printid
eipe@eipe-system:~$ ls -l | grep printid
-rwsr-xr-x 1 eipe egroup 7249 2010-12-22 16:24 printid
-rwxr-xr-x 1 eipe egroup 252 2010-12-22 15:45 printid.c


Again tom logs in.


tom@eipe-system:/home/eipe$ ./printid
Real UID = 1001
Effective UID = 1000
Real GID = 1001
Effective GID = 1001


Now we conclude that tom is able to run the file (because it's group or other-executable) and the program now turned into a process, get's all the privileges of eipe (because it's uid is set).
Most of the cases this poses a lot of security complications and so setuid is advised to be used very carefully)

Now lets change sgid.

eipe@eipe-system:~$ chmod g+s printid
eipe@eipe-system:~$ ls -l | grep printid
-rwsr-sr-x 1 eipe egroup 7249 2010-12-22 16:24 printid
-rwxr-xr-x 1 eipe egroup 252 2010-12-22 15:45 printid.c

Again tom logs in.

tom@eipe-system:/home/eipe$ ./printid
Real UID = 1001
Effective UID = 1000
Real GID = 1001
Effective GID = 1000

Similar to SUID, SGID also grants privileges and access rights to the process running the command, but instead of receiving those of the file’s owner it receives those of the file’s group.

When SGID is set on a directory it has a special meaning.

Files created in a directory with SGID set will inherit the same group ownership as the directory itself, not the group of the user who created the file.

We create a directory for our dev group - “devdir”.

eipe@eipe-system:~$ cat /etc/group
egroup:x:1000:
tgroup:x:1001:
dev:x:1002:eipe,tom

eipe@eipe-system:~$ mkdir devdir


Now we change the group of the devdir to dev.


eipe@eipe-system:~$ chgrp dev devdir
eipe@eipe-system:~$ ls -l | grep dev
drwxr-xr-x 2 eipe dev 4096 2010-12-22 17:51 devdir


We create a file and check it's group.


eipe@eipe-system:~/devdir$ cat>fileone
eipe@eipe-system:~/devdir$ ls -l
total 0
-rw-r--r-- 1 eipe egroup 0 2010-12-22 17:52 fileone


Now we set the dir's setgid.


eipe@eipe-system:~$ chmod g+s devdir
eipe@eipe-system:~$ ls -l |grep dev
drwxr-sr-x 2 eipe dev 4096 2010-12-22 17:52 devdir
drwxrwxr-t 2 eipe dev 4096 2010-12-16 20:34 share


We create a second file in devdir.


eipe@eipe-system:~$ cd devdir
eipe@eipe-system:~/devdir$ cat>filetwo
eipe@eipe-system:~/devdir$ ls -l
total 0
-rw-r--r-- 1 eipe egroup 0 2010-12-22 17:52 fileone
-rw-r--r-- 1 eipe dev 0 2010-12-22 17:54 filetwo


Now any file created within devdir get's it's default group as dev. If the directory is given group-writable then tom could also cd in and create his files which could be also in dev group.

Modes and Permission - Sticky bit

A new problem

Now if I create another file in share that also needs to be shared. I need to change the group of very file I plans to share and sometimes the permissions also. This is not workable.
I create 2 files – efile and list.sh. (list.sh is ug+x)
eipe@eipe-system:~/share$ ls -l
total 12
-rw-r--r-- 1 eipe egroup 15 2010-12-12 18:29 efile
-rwxr-xr-- 1 eipe dev 7 2010-12-12 16:39 lister.sh
-rwxr-xr-- 1 eipe egroup 3 2010-12-12 18:35 list.sh

we see that the new files created has the creator's group!!!

Does changing the group of the parent directory help?
Let's try.
eipe@eipe-system:~$ chgrp dev share

tom log's in.
tom@eipe-system:/home/eipe/share$ ./list.sh
bash: ./list.sh: Permission denied
tom@eipe-system:/home/eipe/share$ cat>tfile
bash: tfile: Permission denied
tom@eipe-system:/home/eipe/share$ rm efile
rm: remove write-protected regular file `efile'? y
rm: cannot remove `efile': Permission denied


Tom cannot run/create/remove files within the group shared folder!!! (Note: folder is read-execute)

Solution:

Let's make the directory writable.
eipe@eipe-system:~$ ls -l | grep share
drwxr-xr-x 2 eipe dev 4096 2010-12-12 18:17 share
eipe@eipe-system:~$ chmod g+w share
eipe@eipe-system:~$ ls -l | grep share
drwxrwxr-x 2 eipe dev 4096 2010-12-12 18:17 share

Now tom logs in.
tom@eipe-system:/home/eipe/share$ ./list.sh
bash: ./list.sh: Permission denied
tom@eipe-system:/home/eipe/share$ cat>tfile
tom able to create file in this dir
tom@eipe-system:/home/eipe/share$ rm efile
rm: remove write-protected regular file `efile'? y

tom@eipe-system:/home/eipe/share$ ls -l
total 12
-rwxr-xr-- 1 eipe dev 7 2010-12-12 16:39 lister.sh
-rw-r--r-- 1 eipe egroup 3 2010-12-12 18:35 list.sh
-rw-r--r-- 1 tom tgroup 36 2010-12-13 18:44 tfile

Tom is able to create and delete file's in the directory. But he won't be able to execute or modify the files unless he modifies the individual file permissions and change group ownership to dev. (Note: Easy solution is to make it others-executable).

Default Permission Settings

Now you must have noticed the default behavior of unix. (provided default umask, 0022 in most systems, is not changed)
Standard permission for file is 666 and for folder is 777. So folders and files get the permissions set as
777 - 022 = 755
666 - 022 = 644
(- denotes bitwise AND)
Reason why files are not given executable permissions is security. Only the creator is allowed to make a file executable.
Note:
It allows users within the same group to
  1. create files in the shared folder
  2. delete files in the shared folder
It doesn't allows users within the group to
  1. modify files in the shared folder
    Solution: make individual files g+w and group changed to dev.
  2. execute files in the shared folder
    Solution: make individual files g+x and group changed to dev.
We will see later that there is a short cut to make all files created in a folder to have the group ID of it's parent folder. (setGID bit). But there is no shortcut to modifying permissions. You cannot set a umask on a folder but we could set a specific umask for a user by modifying the .bashrc file in a users home folder.
GROUP=`grep $LOGNAME /etc/passwd | cut -f4 -d:`
if [ "$GROUP" == "YOURGROUP" ]
then
umask 007
fi

Thus our solution for the first problem is
  1. To change groupID of new files created in a folder to the folder's groupID we manipulate setGID bit.
  2. To make the permissions same for all files created under the folder – is not possible. But we could limit the permissions of each user.
You might be wondering why the files are delete-able and not modifiable. The explanation lies in understanding the meaning of permissions on a directory and a file.
Write on a file means the ability to edit the file.
Write on a directory means the ability to create and delete files under it.

Now consider a situation when the group wants all it's users to have only create and not delete permissions on a directory.

Solution:
Sticky Bit

Sticky Bit

In olden times, the sticky bit was used to write a file (program) to memory so it would load more quickly when invoked. On Linux, however, it serves a different function. When you set the sticky bit on a directory, it limits people's ability to delete things in that directory. That is, to delete a given file in the directory you either must own that file or own the directory.


To set the sticky bit, issue the command:

chmod +t directory_name
eipe@eipe-system:~$ chmod +t share
eipe@eipe-system:~$ ls -l | grep share
drwxrwxr-t 2 eipe dev 4096 2010-12-13 19:08 share

A uppercase T denotes that the directory is not other-executable and has the sticky bit set.
A lowercase t denotes that the directory is other-executable and has the sticky bit set.
Now tom log's in.
tom@eipe-system:/home/eipe/share$ ls -l
total 16
-rw-r--r-- 1 eipe egroup 20 2010-12-13 21:07 efile
-rwxr-xr-- 1 eipe dev 7 2010-12-12 16:39 lister.sh
-rw-r--r-- 1 eipe egroup 3 2010-12-12 18:35 list.sh
-rw-r--r-- 1 tom tgroup 36 2010-12-13 18:44 tfile
tom@eipe-system:/home/eipe/share$ rm efile
rm: remove write-protected regular file `efile'? y
rm: cannot remove `efile': Operation not permitted .

Note: Sticky bit applies to directory one-level down. If there are directories inside, that also needs to be shared, then they also need to be manually applied sticky bit.

Continue reading here

Modes and Permissions - Advanced

umask

When a new file is created on a Unix-like system, its permissions are determined from the umask of the process that created it. It denotes what permissions needs to be removed by means of masking the binary values (of the given octal value) with the default value(value when umask is not used).
eipe@eipe-system:~/temp$ umask
0022

the default value of umask changes from OS to OS. In Ubuntu it's 0022. First, let's see what happens if we turn mask to all 0s. When umask is given value 0000 it's equivalent to turning it off.
eipe@eipe-system:~/temp$ umask 0000
eipe@eipe-system:~/temp$ umask
0000

Let's now create a file and see what it's permissions are.
eipe@eipe-system:~/temp$ > myfile
eipe@eipe-system:~/temp$ ls -l
total 0
-rw-rw-rw- 1 eipe eipe 0 2010-12-10 21:57 myfile

The default permission when no masking is used is read and write for user, group and everyone.
In binay notation it's 110 110 110.

Now let's give masking a value.
eipe@eipe-system:~/temp$ umask 0022
eipe@eipe-system:~/temp$ > myfile
eipe@eipe-system:~/temp$ ls -l
total 0
-rw-r--r-- 1 eipe eipe 0 2010-12-10 22:00 myfile

masking is actually an XOR operation of binary values. (0022 = 000 000 010 010)
1 and 0 = 1 ; 1 and 1 = 0 ; 0 and 0 = 0

000 110 110 110
000 000 010 010
-------------------
000 110 100 100
-------------------

The first 3 bits or the first octal number is used for special settings. They are used for setuid/setgid/sticky bit.

For example consider the below scenario:

Let's create a new user "tom".
It the group names (also known as primary groups) aren't changed, the default names are same as the user names. i.e, for eipe the group name is "eipe" and for tom it is "tom".

Let's change the group names to avoid confusion.
eipe@eipe-system:~$ groupmod -n eipe egroup
eipe@eipe-system:~$ groupmod -n tom tgroup

(we changed the default group names "eipe" and "tom" to "egroup" and "tgroup").

Let's create a new group "dev".
eipe@eipe-system:~$ groupadd dev

Add users to this group:
eipe@eipe-system:~$ usermod -a -G dev eipe tom


Let's check the individual user ID's.
eipe@eipe-system:~$ id eipe
uid=1000(eipe) gid=1000(egroup) groups=1000(egroup),4(adm),20(dialout),24(cdrom),46(plugdev),111(lpadmin),119(admin),122(sambashare),1002(dev)

eipe@eipe-system:~$ id tom
uid=1001(tom) gid=1001(tgroup) groups=1001(tgroup),1002(dev)


Note:
All user account related information are stored in
/etc/passwd – user account details
/etc/shadow – user password details
/etc/group – group account details

A sample entry in /etc/group

egroup:x:1000:
tgroup:x:1001:
dev:x:1002:eipe,tom

groups [username]

To list the groups the user (given by the username) has membership.

eipe@eipe-system:~/share$ groups
egroup adm dialout cdrom plugdev lpadmin admin sambashare dev

eipe@eipe-system:~/share$ groups tom
tom : tgroup dev


members groupname

To list the members of a particular group.
eipe@eipe-system:~/share$ members dev
eipe tom


Let's consider a scenario.

I(eipe) create's a folder “share” that needs to be shared among other users.
eipe@eipe-system:~$ mkdir share
eipe@eipe-system:~$ ls -l | grep share
drwxr-xr-x 2 eipe egroup 4096 2010-12-12 15:01 share


note that we need the folder to be group-executable so change the permissions if necessary for group to r-x.

Then I create a script file called “lister.sh” in share.
eipe@eipe-system:~/share$ cat>lister.sh
ls -la
eipe@eipe-system:~/share$ ./lister.sh
bash: ./lister.sh: Permission denied


This is because any file is not executable by default.
eipe@eipe-system:~/share$ ls -l
total 4
-rw-r--r-- 1 eipe egroup 7 2010-12-12 16:39 lister.sh

Since I'm planning to make it shareable I need to make it executable for both me (eipe) and my groups.
eipe@eipe-system:~/share$ chmod ug+x lister.sh
eipe@eipe-system:~/share$ ./lister.sh
total 12
drwxr-xr-x 2 eipe egroup 4096 2010-12-12 16:39 .
drwxr-xr-x 53 eipe egroup 4096 2010-12-12 16:39 ..
-rwxr-xr-- 1 eipe egroup 7 2010-12-12 16:39 lister.sh

Now tom logs in.
eipe@eipe-system:~$ su tom
Password:
tom@eipe-system:/home/eipe$ cd share
tom@eipe-system:/home/eipe/share$ ./lister.sh
bash: ./lister.sh: Permission denied

this is because the group associated with the file is “egroup” and not “dev”. Every file belongs to a user and a group. The group is usually the group of the user who created the file.

There are 2 solutions:

Solution 1:

Since tom is given read access to the file he could copy it to another location and then run that file.
tom@eipe-system:/home/eipe/share$ cp lister.sh /home/tom/clister.sh
tom@eipe-system:/home/eipe/share$ cd /home/tom
tom@eipe-system:~$ ls -l
total 8
-rwxr-xr-- 1 tom tgroup 7 2010-12-12 17:08 clister.sh
-rw-r--r-- 1 tom tgroup 179 2010-12-11 09:40 examples.desktop
tom@eipe-system:~$ ./clister.sh
AND IT WORKS...

Note that tom had to change the directory, since he was in eipe's home folder, where he cannot create files.

Solution 2:

Changing the group ownership of a file.
chgrp groupto filename
-r option is used to change for all files in a directory.
eipe@eipe-system:~/share$ chgrp dev lister.sh
chgrp: changing group of `lister.sh': Operation not permitted

this is because after creating the new group "dev" I didn't restart the system.

After relogging,
eipe@eipe-system:~/share$ chgrp dev lister.sh
eipe@eipe-system:~/share$ ls -l
total 4
-rwxr-xr-- 1 eipe dev 7 2010-12-12 16:39 lister.sh

Now tom logs in and he can execute the file.
eipe@eipe-system:~/share$ su tom
Password:
tom@eipe-system:/home/eipe/share$ ./lister.sh
total 12
drwxr-xr-x 2 eipe egroup 4096 2010-12-12 16:39 .
drwxr-xr-x 54 eipe egroup 4096 2010-12-12 18:09 ..
-rwxr-xr-- 1 eipe dev 7 2010-12-12 16:39 lister.sh


Continue Reading here

Modes & Permissions

Every file in the file system has 3 modes - read, write and execute and 3 permission levels - owner, group and others.

The read, write and execute permissions of file's owner, file's group owner and everybody else are specified using 3 characters each. Totaling to 9 characters + 2 additional characters (we'll see later what those are) = 11 characters.

1st character:   r : readable
2nd character: w : writable
3rd character:  x : executable
Additional characters:
s/t : executable and setuid/setgid/sticky
S/T : setuid/setgid/sticky but not executable


Owner Group World
rwx rwx rwx

chmod

This command is used to change the file's permissions. This command is used in 2 ways
- using an octal representation
- using symbolic representation

Using octal representation

Since we use only 3 values to denote read, write and execute, it could be easily represented as a octal value between 0 to 7.

Octal  Binary FileMode
0         000       ---
1         001       --x
2         010       -w-
3         011      -wx
4         100      r--
5         101      r-x
6         110      rw-
7         111      rwx

Example:
eipe@eipe-system:~/temp$ ls -l
total 4
-rw-r--r-- 1 eipe eipe 6 2010-12-08 18:10 eipe
-rw-r--r-- 1 eipe eipe 0 2010-12-05 15:48 john

eipe@eipe-system:~/temp$ chmod 660 john

eipe@eipe-system:~/temp$ ls -l
total 4
-rw-r--r-- 1 eipe eipe 6 2010-12-08 18:10 eipe
-rw-rw---- 1 eipe eipe 0 2010-12-05 15:48 john


Using symbolic notation

it's divided into 3 parts

<who the change will affect><what operation><what permission>

The notations used are:


< u / g / o / a >< + / - / = >< r / w / x >


u – user/file owner
g – group owner
o – others/public
a – all, includes u,g,o

+   permission needs to be added
-   permission needs to be removed
=   permission needs to be applied and others removed

eipe@eipe-system:~/temp$ chmod go+rw eipe
eipe@eipe-system:~/temp$ ls -l
total 4
-rw-rw-rw- 1 eipe eipe 6 2010-12-08 18:10 eipe
-rw-rw---- 1 eipe eipe 0 2010-12-05 15:48 john

eipe@eipe-system:~/temp$ chmod u+x,go-rwx eipe
eipe@eipe-system:~/temp$ ls -l
total 4
-rwx------ 1 eipe eipe 6 2010-12-08 18:10 eipe
-rw-rw---- 1 eipe eipe 0 2010-12-05 15:48 john


Using GUI
In both Nautilus (GNOME) and Konqueror (KDE), right-clicking a file or directory icon will open a properties dialog.

Meaning of read, write and execute

read Permission
On Files:
Allows files to be opened and read.
On Directories:
Allows to list the contents within the directory. But it does not show any information other than the filename.
Example:
eipe@eipe-system:~$ mkdir privatedir
eipe@eipe-system:~$ chmod o-x privatedir
eipe@eipe-system:~$ cd privatedir/
eipe@eipe-system:~/privatedir$ touch privatefile
eipe@eipe-system:~/privatedir$ mkdir insidepdir
eipe@eipe-system:~/privatedir$ chmod o-x insidepdir

Now another user say, Tom logs in,
eipe@eipe-system:~$ su tom
Password:
tom@eipe-system:/home/eipe$ cd privatedir
bash: cd: privatedir: Permission denied
tom@eipe-system:/home/eipe$ ls -l privatedir
ls: cannot access privatedir/insidepdir: Permission denied
ls: cannot access privatedir/privatefile: Permission denied
total 0
d????????? ? ? ? ? ? insidepdir
-????????? ? ? ? ? ? privatefile

tom@eipe-system:/home/eipe/privatedir$ cat privatefile
this is a file
tom@eipe-system:/home/eipe/privatedir$ cat>>privatefile
bash: privatefile: Permission denied


write Permissions
On Files:
Allows files to be written/truncated.
On Directories:
Allows files to be created/deleted/renamed within the directory.

Example is given at the end.

execute Permissions
On File:
Allows files to be executed. This permission must be set for executable binaries (For eg, a compiled C program) or shell scripts (For eg, a Perl program) in order to allow the operating system to run them.
On Directories:
Allows the entry into the directory.

Example:
Let's provide execute permission on privatedir
eipe@eipe-system:~$ chmod o+x privatedir
eipe@eipe-system:~$ cd privatedir/
eipe@eipe-system:~/privatedir$ cat>>privatefile
this is a file
^C
eipe@eipe-system:~/privatedir$ cd insidepdir/
eipe@eipe-system:~/privatedir/insidepdir$ cat>insidefile
this is inside^C
eipe@eipe-system:~/privatedir/insidepdir$ cd ..
eipe@eipe-system:~/privatedir$ ls -l
total 8
drwxr-xr-- 2 eipe egroup 4096 2011-02-02 22:09 insidepdir
-rw-r--r-- 1 eipe egroup 15 2011-02-02 21:41 privatefile


Now Tom logs in,
tom@eipe-system:/home/eipe$ ls -l privatedir
total 4
drwxr-xr-- 2 eipe egroup 4096 2011-02-02 21:27 insidepdir
-rw-r--r-- 1 eipe egroup 0 2011-02-02 21:27 privatefile

this is because privatedir is executable.
Now let's try a search
tom@eipe-system:/home/eipe$ cd privatedir/
tom@eipe-system:/home/eipe/privatedir$ find . -name "insidefile" -type f

No output is displayed. That means the file was not found. This is because to open/see a file within a directory (In this case, privatedir/insidedir/insidefile), the user needs to have execute permission not only in privatedir but also in every direcotry that comes in that path.
eipe@eipe-system:~/privatedir$ chmod o+x insidepdir
tom@eipe-system:/home/eipe/privatedir$ find . -name "insidefile" -type f
./insidepdir/insidefile

Now it works!!!

But still tom cannot do anything in privatedir or in insidedir other than viewing.
tom@eipe-system:/home/eipe/privatedir$ touch otherprivatefile
touch: cannot touch `otherprivatefile': Permission denied

For this we need to set the write permissions on the directories.
eipe@eipe-system:~$ chmod o+w privatedir

tom@eipe-system:/home/eipe/privatedir$ touch otherprivatefile
tom@eipe-system:/home/eipe/privatedir$ ls -l
total 8
drwxr-xr-x 2 eipe egroup 4096 2011-02-02 22:09 insidepdir
-rw-r--r-- 1 tom tgroup 0 2011-02-02 22:34 otherprivatefile
-rw-r--r-- 1 eipe egroup 15 2011-02-02 21:41 privatefile

Continue here

File System part III

In windows we have a concept of partitions named like C, D, etc. But in linux we have concept of device files (which are special files).
In ubuntu one can use the Disk Utility program to view the devices and their mount point's if it's mounted. A device or drive is mounted on to the existing file system which is mounted at /.
If you are using a terminal type
cat /etc/fstab
to see all the mountable devices, including floppy disks and CD players.
Type
df
to see the devices currently mounted, and their free space.

Notes:
In Unix '.' means the directory and '..' means the parent directory. Actually these are pointers to the same directory and to it's parent directory.
And since these are pointers we could use them along with commands.
Eg:
ls .
cd ..


Current working directory and home directory
Unix associates a current working directory with each process. It identifies the directory currently used by the process as it's current working directory.

Processes uses a pathname to identify a file and the pathname consists of slashes alternating with a sequence of directory names that lead to the file.

If the first item in the pathname is a slash, the pathname is said to be absolute, because its starting point is the root directory. Otherwise, if the first item is a directory name or filename, the pathname is said to be relative, because its starting point is the process's current directory.

When we first log in to our system (or start a terminal emulator session) our current
working directory is set to our home directory. Each user account is given its own home
directory and when operating as a regular user, the home directory is the only place the
user is allowed to write files.

When you are in/under your home directory the unix prompt will start with ~
eipe@eipe-system:~$


after you cd Downloads
eipe@eipe-system:~/Downloads$


When you are in the root directory
eipe@eipe-system:/$


If you are the root user (super user) then $ will be replaced by #
eipe@eipe-system:/#


Common commands for directory navigation:

pwd: will print the current working directory.
eipe@eipe-system:~$ pwd
/home/eipe


ls: to list out the files in the current directory.
Common options used with ls are
ls -a :to display all the hidden files (names begin with . And also the pointers '.' and '..')
eipe@eipe-system:~/Documents$ ls -a
. Argument.docx cpparchive.cpp java Network.png
.. carchive.c Essays.docx linux

ls -l : Results in long format.
eipe@eipe-system:~/Documents$ ls -l
total 2008
-rw------- 1 eipe eipe 10918 2009-01-12 21:13 Argument.docx
-rw------- 1 eipe eipe 37277 2010-02-13 16:05 carchive.c
-rw------- 1 eipe eipe 53817 2010-06-11 01:24 cpparchive.cpp
-rw------- 1 eipe eipe 17540 2008-12-13 11:43 Essays.docx
drwxr-xr-x 5 eipe eipe 4096 2010-11-29 11:08 java
drwxr-xr-x 2 eipe eipe 4096 2010-12-02 22:52 linux
-rw-r--r-- 1 eipe eipe 1821268 2010-10-04 14:14 Network.png
-rw-r--r-- 1 eipe eipe 91615 2010-10-04 14:09 network-protocols-map-poster-1.gif


Description of columns:
First line shows the total size of the directory in this case 2008 bytes.
Col 1 : files access permissions.
Col 2 : depends (see below)
Col 3 : user name of the file's owner.
Col 4 : file's group owner name.
Col 5 : size of the file in bytes.
Col 6 : date and time of files last modification date.
Col 7 : name of file (color coding used to display the file is user dependent also system dependent ie., it changes with respect to any specific user's settings or for different distributions.)

Note:
Col(1) prints the
file type (1 char)
permissions for owner (3 chars)
permissions for group (3 chars)
permissions for world (3 chars)
Col(2) prints the
no: of subdirectories if that item is a directory. If the directory is empty it will print 2 by default.
If it's a normal file it prints 1 by default. If it's a hard link then the number of hard links.

ls -l -h : to print sizes in human-readable format
eipe@eipe-system:~/Documents$ ls -l -h
total 2.0M
-rw------- 1 eipe eipe 11K 2009-01-12 21:13 Argument.docx
-rw------- 1 eipe eipe 37K 2010-02-13 16:05 carchive.c
-rw------- 1 eipe eipe 53K 2010-06-11 01:24 cpparchive.cpp
-rw------- 1 eipe eipe 18K 2008-12-13 11:43 Essays.docx
drwxr-xr-x 5 eipe eipe 4.0K 2010-11-29 11:08 java
drwxr-xr-x 2 eipe eipe 4.0K 2010-12-02 22:52 linux
-rw-r--r-- 1 eipe eipe 1.8M 2010-10-04 14:14 Network.png
-rw-r--r-- 1 eipe eipe 90K 2010-10-04 14:09 network-protocols.gif

File system part II

In unix all files and directories are under a single parent directory called root. It is denoted by forward slash '/'.


The Filesystem Hierarchy Standard (FHS) defines the main directories and their contents in Linux operating systems.

Directory sturcture:

The majority of these directories exist in all UNIX operating systems and are generally used in much the same way; however, the explanations given here are aligned with the FHS standard.

The below table describes everything you need to know about the default directory structure provided by the linux/unix systems.

/bin/ Essential command libraries that are needed in single-user mode (eg:cat, ls)
These commands are accessible to both the admin and other users.
It usually doesn't contain subdirectories.
The following commands, or symbolic links to commands, are required in /bin.
Command Description
cat To concatenate files and print on std output.
chgrp To change file group ownership
chmod To change the file access permission
chown To change the file owner and group
cp To copy files and directories
date To print or set the system date and time
dd To convert and copy a file
df To report file system disk space usage
dmesg To print or control the kernal message buffer. Kernel output goes to the kernel ring buffer and not to stdout, because stdout is ess specific. To inspect messages on the kernel ring buffer, one can use the dmesg utility.
echo To display a line of text
hostname To show or set the system's host name
kill To send signals to processes
ln To link files
login To begin a session on the system
ls To display contents of directory
mkdir To create directories
mknod To make block or character special files
more To page through lengthy text
mount/unmount To mount/unmount a file system
mv To move or rename files
ps To report processes
pwd To print name of current working directory
rm To remove files or directories
rmdir To remove empty directories
sed The sed stream editior
sh The bourne command shell
stty To change and print terminal line settings
su To change user ID
sync To flush filesystem buffers
uname To print system information


/boot/ Boot loader files
/dev/ Location of special or device files. If you do cd /dev and then ls, you'll see a lot of yellow outlined in black. These are the devices that your system uses or can use. Everything is considered a file in Linux, so your hard disk is kept track of as a file that sits there. If you're using an IDE hard drive (as opposed to SCSI), your hard drive will be known as /dev/hda./dev must contain a command named
MAKEDEV, which can create devices as needed. It may also contain a MAKEDEV.local for any local devices.
/etc/ It contains configuration files. A "configuration file" is a local file used to control the operation of a program; it must be static and cannot be an executable binary .
/etc/opt/ Configuration files for /opt
/etc/X11/ Configuration for the X Window system. This directory is necessary to allow local control if /usr is mounted read only.
/etc/sgml/ Configuration for SGML
/etc/xml/ Configuration for XML
/home/ home is a fairly standard concept, but it is clearly a site-specific filesystem. In normal configurations, each user is given a directory in /home.
User specific configuration files for applications are stored in the user’s home directory in a file that starts with the ’.’ character (a "dot file"). If an application needs to create more than one dot file then they should be placed
in a subdirectory with a name starting with a ’.’ character, (a "dot directory"). In this case the configuration files should not start with the ’.’ character. To view the files cd /home and then ls -a.
/lib/ Libraries needed for system boot and for commands in /bin and /sbin. If loadable kernal modules (LKM) are used then they are put in /lib/modules
/media/ On modern Linux systems the /media directory will
contain the mount points for removable media such USB
drives, CD-ROMs, etc. that are mounted automatically at
insertion.
/mnt/ On older Linux systems, the /mnt directory contains mount
points for removable devices that have been mounted
manually.
/opt/ /opt is reserved for the installation of add-on application (mostly commercial) software packages.
/proc/ The /proc filesystem (is a special type of filesystem) was originally developed to provide information on the processes in a system. But given the filesystem's usefulness, many elements of the kernel use it both to report information and to enable dynamic runtime configuration.
The /proc filesystem contains directories (named by processid, each representing a process) and virtual files (used to transfer information from the kernal to the user and vice versa.
http://www.ibm.com/developerworks/linux/library/l-proc.html
/root/ Home directory for the root user (optional)
/sbin/ Utilities used for system administration (and other root-only commands) are stored in
/sbin,
/usr/sbin, and
/usr/local/sbin.
/sbin contains binaries essential for booting, restoring, recovering, and/or repairing the system in addition to the binaries in /bin.
Programs executed after /usr is successfully mounted are generally placed into /usr/sbin.
Locally-installed system administration programs should be placed into /usr/local/sbin.
Common cmds found under sbin are: shutdown, reboot, fdisk, fsck, halt, init, etc.
Difference between sbin and bin: he division between /bin and /sbin was not created for security reasons or to hide the OS, but to provide a good partition between binaries that everyone uses and ones that are primarily used for administration tasks. Though for certain cmds in sbin execute permission is given only to the administrator.
/srv/ Data for services provided by this system
/tmp/ The /tmp directory must be made available for programs that require temporary files.
Programs must not assume that any files or directories in /tmp are preserved between invocations of the program.
/usr/ Secondary hierarchy for read-only user data; contains the majority of (multi-)user utilities and applications.
/usr/bin/ Non-essential command binaries (not needed in single user mode); for all users.
/usr/include/ This is where all of the system’s general-use include files (header files) for the C programming language should be placed.
/usr/lib/ Libraries for the binaries in /usr/bin/ and /usr/sbin/.
/usr/sbin/ Programs executed after /usr is successfully mounted are generally placed into /usr/sbin. It mostly contains cmds for mounting, repair, recovery,etc.
/usr/share/ The /usr/share hierarchy is for all read-only architecture independent data files.
This hierarchy is intended to be shareable among all architecture platforms of a given OS; thus, for example, a site with i386, Alpha, and PPC platforms might maintain a single /usr/share directory that is centrally-mounted.
Note, however, that /usr/share is generally not intended to be shared by different OSes or by different releases of the same OS.
/usr/share/man : Manual pages
/usr/share/doc Most packages installed on the system will include some kind of documentation. In /usr/share/doc, we will
find documentation files organized by package.
/usr/src/ Source code may be place placed in this subdirectory, only for reference purposes.
/usr/X11R6 This hierarchy is reserved for the X Window System, version 11 release 6, and related files.
/usr/local/ The /usr/local hierarchy is for use by the system administrator when installing software locally. It needs to be safe from being overwritten when the system software is updated. Programs compiled from source code
are normally installed in /usr/local/bin. On a newly
installed Linux system, this tree exists, but it will be empty
until the system administrator puts something in it.
/var/ /var contains variable data files. This includes spool directories and files, administrative and logging data, and
transient and temporary files.
/var/cache/ /var/cache is intended for cached data from applications. Such data is locally generated as a result of time-consuming I/O or calculation.
/var/lib/ This hierarchy holds state information pertaining to an application or the system. State information is data that programs modify while they run, and that pertains to one specific host.
/var/lock/ Lock files for devices and other resources shared by multiple applications .
/var/log/ This directory contains miscellaneous log files. Most logs must be written to this directory or an appropriate subdirectory.
/var/mail/ The mail spool must be accessible through /var/mail and the mail spool files must take the form <username>.
/var/run/ This directory contains system information data describing the system since it was booted. Files under this directory must be cleared (removed or truncated as appropriate) at the beginning of the boot process.
/var/spool/ contains data which is awaiting some kind of later processing. Data in /var/spool represents work to be done in the future (by a program, user, or administrator); often data is deleted after it has been processed.
/var/tmp/ Temporary files preserved between system reboots
/lost+found Each formatted partition or device using a Linux file system,
such as ext3, will have this directory. It is used in the case
of a partial recovery from a file system corruption event.
Unless something really bad has happened to your system,
this directory will remain empty.

Click here to read File system part III