blogger templates blogger widgets
Showing posts with label unix tutorials. Show all posts
This is part of a list of blog posts.
To browse the contents go to

sudo Basics

Install sudo (substitute user do)

If you have used Ubuntu, you might be familiar with sudo. It allows users to run programs with privileges of another user (normally a superuser).
Using sudo, a user needn't login as a root. He can rent that privilege using the sudo command to perform privileged tasks.
To install sudo in ArchLinux:
#pacman -Syu sudo
Use appropriate package manager depending upon your distribution. In Archlinux, pacman is the default package manager.

Now I needn't use the system as root. So I create a account for myself.

Add a new user account

To create a new user account use adduser program:

Options:
-d home directory
-s starting program (shell)
-p password
-g (primary group assigned to the users)
-G (Other groups the user belongs to)
-m (Create the user's home directory
[root@myhost ~]# useradd -d/home/onie -m onie

Modify or add password
To add a password to a user account use passwd command.
[root@myhost ~]# passwd onie
Enter new UNIX password:
Retype new UNIX password:
passwd: password updated successfully

Switch to another user account

To switch to another user, we use the su command. This is most commonly used to switch to the root account.

Example: To switch to root account
su
(When asked for password enter root's password)

Example: To switch to the user 'onie'
su onie
(Enter onie's password)
To return to original user, enter exit

Modifying existing user accounts

To modify a user account we use usermod command.
Options:
-d home directory
-s starting program (shell)
-p password
-g (primary group assigned to the users)
-G (Other groups the user belongs to)

Deleting a user account

To delete user account we use userdel command.
Options:
-r (remove home directory)

To know more about group/user creation and modification: User and Groups Tutorial

To continue to SUDO configuration : SUDO tutorial
Sudo article from Archwiki pages: Sudo

sudo Tutorial

If you are using Ubuntu, you will already have sudo installed. But if you are on other linux distros like ArchLinux, you need to install it by yourself.

After installing, you need to create a account for yourself. Read about creating, modifying and switching accounts here

Configure sudo

Sudo's configuration file is /etc/sudoers. You can edit it using vi but it's advised to edit it using the visudo command.
#visudo


visudo command opens your sudoers file using nano editor. You can change that to your preferred editor (I prefer vim) in 3 ways
  1. Just for once.
    If you want to use another editor only this time, Run
    #EDITOR=vim visudo

  2. At all times
    If you want sudoers file to be opened in editor of your choice at all times, then
    #EDITOR=vim visudo

    Append this line to the top of the file.
    Defaults editor=/usr/bin/vim

  3. System-wide setting
    To set your preferred editor as the default editor for your whole system, add the below line to ~/.bashrc file.
    export EDITOR=vim

Note: Whatever be the case, we still should open the file using visudo command.


Why do you need to use visudo and not vi sudo?
visudo locks the sudoers file, saves edits to a temporary file, and checks that file's grammar before copying it to /etc/sudoers. It is imperative that sudoers be free of syntax errors since it will not run otherwise.

To give a user or group root privileges add this line.
USER_NAME ALL=(ALL)ALL

So I added the below line to the sudoers file.
onie ALL=(ALL)ALL NOPASSWD: ALL

NOPASSWD: ALL removes the password requirement everytime you sudo.


What does "ALL" mean here?
It's a built in aliases. It could be used in place of any other alias.


What happens when a user who is not listed in sudoers file tries to run sudo?
A mail get sent. To whom? Well, mostly to system administrators. But it's configurable via "default entries".


How does a user try out sudo without sending a mail?
use -l or -v option.
[onie@myhost root]$ sudo -v
Password:
[onie@myhost root]$ sudo -l
User onie may run the following commands on this host:
(ALL) ALL

This allows users to check for themselves whether or not they are allowed to use sudo.


How long does the sudo effect last?>
Once a user uses sudo, the sudo privilege lasts for 5 minutes (default). That means you can run other admin commands without entering password each time. This can be modified using "Default entries".


What does "Defaults env_reset" mean?
It resets the terminal environment after switching to root. So, all user set variables gets removed. There are a lot other "Default entries".

Default entries

Certain configuration options may be changed from their default values at runtime via one or more Default Entry lines. These may affect all users on any host, all users on a specific host, a specific user, a specific command, or commands being run as a specific user.
Few of the common overrides are:
  • env_reset
    If set, sudo will reset the environment to only contain the LOGNAME, MAIL, SHELL, USER, USERNAME and the SUDO_ variables.
  • mail_always
    Send mail to the mailto user every time a users runs sudo. This flag is off by default.
  • mail_badpass
    Send mail to the mailto user if the user running sudo does not enter the correct password. This flag is off by default.
  • mail_no_user
    If set, mail will be sent to the mailto user if the invoking user is not in the sudoers file. This flag is on by default.
  • rootpw
    If set, sudo will prompt for the root password instead of the password of the invoking user. This flag is off by default.
  • passwd_timeout
    Number of minutes before the sudo password prompt times out. Use 0 for no timeout. The default is 5.
  • timestamp_timeout
    timestamp_timeout
    Number of minutes that can elapse before sudo will ask for a passwd again. The default is 5. Set this to 0 to always prompt for a password. If set to a value less than 0 the user's timestamp will never expire.
For a detailed look at these, check out the Sudoers Manual
Also there is a sample sudoers file available: sample.sudoers


A Detailed look at Sudoers file

The sudoers file is composed of two types of entries:
  • aliases (basically variables)
  • user specifications (which specify who may run what)


Aliases

There are 4 kinds of aliases.
User_Alias, Runas_Alias, Host_Alias and Cmnd_Alias.
Each alias definition is of the form:
Alias_Type NAME = item1, item2, ...
where

Alias_Type is one of User_Alias, Runas_Alias, Host_Alias or Cmnd_Alias.
a name is the alias name (it could be a string of uppercase letters, numbers and underscores).
item1, item2,.. are values. And these depend on the type of alias you are dealing with.
You can put several aliases of the same type on one line by separating them with colons (:) as so:
Alias_Type NAME1 = item1, item2 : NAME2 = item3


The text that follow are taken from the Ubuntu documentation pages.

User Aliases

User aliases are used to specify groups of users. You can specify usernames, system groups (prefixed by a %) and netgroups (prefixed by a +) as follows:
# Everybody in the system group "admin" is covered by the alias ADMINS
User_Alias ADMINS = %admin
# The users "tom", "dick", and "harry" are covered by the USERS alias
User_Alias USERS = tom, dick, harry
# The users "tom" and "mary" are in the WEBMASTERS alias
User_Alias WEBMASTERS = tom, mary
# You can also use ! to exclude users from an alias
# This matches anybody in the USERS alias who isn't in WEBMASTERS or ADMINS aliases
User_Alias LIMITED_USERS = USERS, !WEBMASTERS, !ADMINS


Runas Aliases

Runas Aliases are almost the same as user aliases but you are allowed to specify users by uid's. This is helpful as usernames and groups are matched as strings so two users with the same uid but different usernames will not be matched by entering a single username but can be matched with a uid. For example:
# UID 0 is normally used for root
# Note the hash (#) on the following line indicates a uid, not a comment.
Runas_Alias ROOT = #0
# This is for all the admin users similar to the User_Alias of ADMINS set earlier
# with the addition of "root"
Runas_Alias ADMINS = %admin, root


Host Aliases

A host alias is a list of hostname, ip addresses, networks and netgroups (prefixed with a +). If you do not specify a netmask with a network the netmask of the hosts ethernet interface(s) will be used when matching.
# This is all the servers
Host_Alias SERVERS = 192.168.0.1, 192.168.0.2, server1
# This is the whole network
Host_Alias NETWORK = 192.168.0.0/255.255.255.0
# And this is every machine in the network that is not a server
Host_Alias WORKSTATIONS = NETWORK, !SERVER
# This could have been done in one step with
# Host_Alias WORKSTATIONS = 192.168.0.0/255.255.255.0, !SERVERS
# but I think this method is clearer.


Command Aliases

Command aliases are lists of commands and directories. You can use this to specify a group of commands. If you specify a directory it will include any file within that directory but not in any subdirectories.

The special command '"sudoedit"' allows users to run sudo with the -e flag or as the command sudoedit. If you include command line arguments in a command in an alias these must exactly match what the user enters on the command line. If you include any of the following they will need to be escaped with a backslash (\): ",", "\", ":", "=".
Examples:
# All the shutdown commands
Cmnd_Alias SHUTDOWN_CMDS = /sbin/shutdown, /sbin/reboot, /sbin/halt
# Printing commands
Cmnd_Alias PRINTING_CMDS = /usr/sbin/lpc, /usr/sbin/lprm
# Admin commands
Cmnd_Alias ADMIN_CMDS = /usr/sbin/passwd, /usr/sbin/useradd, /usr/sbin/userdel, /usr/sbin/usermod, /usr/sbin/visudo
# Web commands
Cmnd_Alias WEB_CMDS = /etc/init.d/apache2


User Specifications

User Specifications are where the sudoers file sets who can run what as who. It is the key part of the file and all the aliases have just been set up for this very point.

A user specification is in the format

<user list> <host list> = <operator list> <tag list> <command list>

user list - could be a user name or user alias for whom a security restriction/privilege is going to be set.
host list - is a list of hosts/machines or a host alias on which the security restriction/privilege are going to be set.
operator list - is a list of users they must be running as or a runas alias.
command list - is a list of commands or a cmnd alias, they are permitted to operate.
tag list - allows you set special flags for each command. There are 2 common flags used.
PASSWD and NOPASSWD - to specify whether the user has to enter a password or not.
NOEXEC - to prevent any programs launching shells themselves.

For example (using the aliases and users from earlier)
# This lets the webmasters run all the web commands on the machine
# "webserver" provided they give a password
WEBMASTERS webserver= WEB_CMDS
# This lets the admins run all the admin commands on the servers
ADMINS SERVERS= ADMIN_CMDS
# This lets all the USERS run admin commands on the workstations provided
# they give the root password or and admin password (using "sudo -u ")
USERS WORKSTATIONS=(ADMINS) ADMIN_CMDS
# This lets "harry" shutdown his own machine without a password
harry harrys-machine= NOPASSWD: SHUTDOWN_CMDS
# And this lets everybody print without requiring a password
ALL ALL=(ALL) NOPASSWD: PRINTING_CMDS


There is a sample sudoers file available: sample.sudoers

My Life with ArchLinux

I always wanted to have a customized linux distribution. Above that, I needed to know how things work together and how the little pieces connect each other.

The Beginning

After spending much time googling for the best Linux distro that is simple and lightweight. I decided on "Arch Linux".

Downloading Arch Linux

You can get iso images for Arch Linux from it's official site - ArchLinux.org

Since I have a 32-bit computer. I went for CoreImage and i686 CPU. After it's downloaded you need to burn it onto a CD or DVD. It's easy to do it if you have softwares like Nero.
(Another option is to use virtualBox or any other virtualization softwares)
After it's burned. Use the CD/DVD to Boot Arch Linux.

Insert the CD/DVD into your drive and then start/restart the computer.
Press the appropriate key to load the boot screen. (For me it was F12). Select the source as CD/DVD drive.

We get the splash screen in seconds. It looks similar to this.


To install ArchLinux we need to first boot into the liveCD environment. So select the first option.
Once the boot process is completed. You get the shell prompt.
Login as root.
Then, we initiate setup using the setup script. Run,

#/arch/setup


From here onwards you need to be extremely careful. There is a wonderful video tutorial in youtube which I made good use of.


If you follow the steps exactly given in the video, likely there won't be any problems.
I didn't choose memory for swap partition. You may do so if you have low RAM space or if you need to hibernate your system.
Also, I chose vi as my default text editor and not nano. Choose any editor you are comfortable with.

ArchWiki
There is a neat manual in Archwiki pages, Arch Linux Beginners Guide
This is something you wouldn't want to miss. It's self-explanatory and simple.

I was faced with 2 problems. I installed GRUB and modified entries as explained in the video but still my computer couldn't load GRUB. Also I forgot to install it on the MBR.

What went wrong?
I had been modifying the grub entry for the currently loaded linux image (which is from LiveCD) and not the one installed on my HD.
Here is the solution:
Boot into Arch using your CD. Mount the partition where you installed /boot.
For me it was dev/sda6 so here is what I did.

mount /dev/sda6 /media

media is a folder under root were other partitions are usually mounted.
Now cd into /media to locate grub/menu.lst
menu.lst is the configuration file for GRUB. Modify the entries as explanined in the video.

Now to install it in the MBR. Open grub shell by typing

#grub


This will open the GRUB shell. The following command installs GRUB to the MBR of your HD.

grub>setup (hd0)


Type "quit" to exit GRUB.

Restart the system and check if GRUB loads fine.

There is a detailed reference to GRUB in ArchWiki: GRUB

Post Installation - The Fun part

Now you have a clean Arch linux base system. If you have reached this point, it's up to you to make your glorious custom Linux distro.

There are a thousand options and choices out there. So it's your personal taste.

Anyways there are a few common steps.

Additionally, I installed tea a text editor and a terminal emulator.
pacman -Syu tea
What is a terminal emulator?
The simplest definiton is that "it's a software used to interact with a shell".
xterm is the default terminal emulator of X Widnow system. It has certian drawnbacks, like it doesn't offer options to copy or paste within the console.
sakura is a terminal emulator based on GTK and VTE. It's a terminal emulator with few dependencies, so you don't need a full GNOME desktop installed to have a decent terminal emulator.
pacman -Syu sakura

Hard links and Soft links in Linux

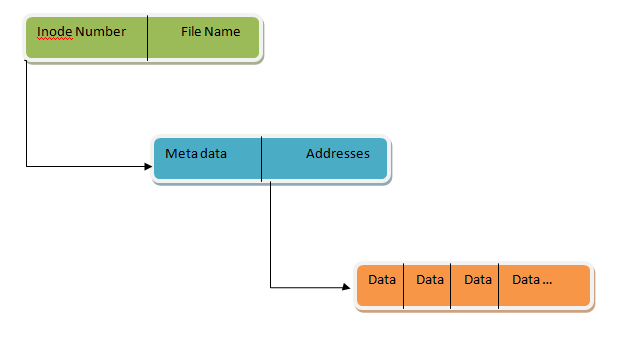
As we saw earlier, Unix files consist of two parts: the data part and the filename part.

The data part is associated with something called an 'inode'. Inode is like an index number that helps is to find where the data is, the file permissions, etc. for the data.
concept of inode in file system

All Unix variants include at least the following attributes, which are specified in the POSIX standard.
  1. File type
  2. Number of hard links associated with the file
  3. File length in bytes
  4. Device ID (i.e., an identifier of the device containing the file)
  5. Inode number that identifies the file within the filesystem
  6. UID of the file owner
  7. User group ID of the file
  8. Timestamps that specify the inode status change time, the last access time, and the last modify time
  9. Access rights (r,w,x values for user, group and others)
  10. File mode (sticky, setuserid, setgroupid)

Hard Links: When more than one file references the same inode entry.
hard links in file system

Soft Links: When the file's data part contains a link/path to another file. The OS recognizes this as a special file and so redirects all open/read/writes to the other file.
soft links in file system

ln command
There are 3 common forms in which ln is used.
$ ln target link_name :create link to target with the link name “link_name” in current directory.
$ ln target :create link to target with the same link name.
$ ln target directory :create link to target (link name same) in the specified directory.

eipe@eipe-system:~$ cat>a
this is a file
eipe@eipe-system:~$ cat a
this is a file
eipe@eipe-system:~$ cd temp
eipe@eipe-system:~/temp$ ln ../a alink
eipe@eipe-system:~/temp$ ls
alink
eipe@eipe-system:~/temp$ cat alink
this is a file


note that the link will be displayed like a normal file. No details that the file is a link is given to the external user.

Hard links have two limitations:
  • It is not possible to create hard links for directories. (to avoid cycles)
  • Links can be created only among files included in the same filesystem
Soft links (Symbolic links) are short files that contain a pathname of another file. The pathname may refer to any file or directory located in any filesystem; it may even refer to a nonexistent file.
The unix command is the same but with -s option.

Example:

eipe@eipe-system:~$ cat>t
thisisafile
eipe@eipe-system:~$ cd temp
eipe@eipe-system:~/temp$ ln ../t thlink
eipe@eipe-system:~/temp$ ls
thlink
eipe@eipe-system:~/temp$ ln -s ../t tslink
eipe@eipe-system:~/temp$ ls
thlink tslink

eipe@eipe-system:~/temp$ ls -la
total 12
drwxr-xr-x 2 eipe eipe 4096 2010-12-03 20:09 .
drwxr-xr-x 48 eipe eipe 4096 2010-12-03 19:38 ..
-rw-r--r-- 2 eipe eipe 6 2010-12-03 14:39 thlink
lrwxrwxrwx 1 eipe eipe 4 2010-12-03 20:09 tslink -> ../t

Note that for soft(symbolic) links the number is 1 but we get a description. Also for '..' the number is 48 meaning there are 48 directories under the parent directory.
How do we know that 2 files are the same (one being a hard link of another)?
Using -i option to print inode numbers

eipe@eipe-system:~$ ls -i -l -a
1055026 -rw-r--r-- 3 eipe eipe 0 2010-12-03 20:14 t
1055062 drwxr-xr-x 2 eipe eipe 4096 2010-12-03 20:09 temp
1704500 drwxr-xr-x 2 eipe eipe 4096 2010-11-24 11:13 Templates
1708831 drwxr-xr-x 2 eipe eipe 4096 2010-11-24 23:49 .themes
1055026 -rw-r--r-- 3 eipe eipe 0 2010-12-03 20:14 thlink


Creating Symlinks the Easy way
The file managers in both GNOME and KDE provide an easy method of creating symbolic links.
  • With GNOME, holding the Ctrl+Shift keys while dragging a file will create a link rather than copying (or moving) the file.
  • With KDE, a small menu appears whenever a file is dropped, offering a choice of
    copying, moving, or linking the file.

Shell commandS

Only the few of the most important commands are discussed here.

cd : to change directory.

cd ..
will go one step above.
cd ./temp
is same as cd temp.
cd –
will take you to the previous directory which you used.
cd ~
will take to home directory.
cd /
will take to root directory.


eipe@eipe-system://usr/lib$ cd ~
eipe@eipe-system:~$ cd -
//usr/lib
eipe@eipe-system://usr/lib$


mkdir : to create directory.

mkdir dir1 dir2
will create 2 directories dir1 and dir2 in the current directory.

cp : copy command

cp file1 file2
Copy file1 to file2. If file2 exists, it is overwritten with the contents of file1. If file2 does not exist, it is created. In either case, both files exists.

cp /vol/examples/tutorial/science.txt .
common options are:
-r : to recursively copy directories and their contents. This option (or the -a option) is required when copying directories.
-a : Copy the files and directories and all of their attributes, including ownerships and permissions. Normally, copies take on the default attributes of the user performing the copy.
-i : if file2 exists, the user is prompted before it is overwritten.

cp file1 file2 file3 dir1
Copy file1, file2, file3 into directory dir1. dir1 must already exist.
cp dir1/* dir2
All the files in dir1 are copied into dir2. dir2 must already exist.

mv : move command

mv file1 file2
Move file1 to file2. If file2 exists, it is overwritten with the contents of file1. If file2 does not exist, it
is created. In either case, file1 ceases to exist.

mv file1 file2 dir1
Move file1 and file2 into directory dir1. dir1 must already exist.

rm : to remove files or directories.

rm file1
Delete file1 silently.
rm -i file1
Same as above, except that the user is prompted for confirmation before the deletion is performed.
rm -r file1 dir1
Delete file1 and dir1 and its contents.
rm -f file1
-f option is used to force delete. It means that if the file does exist it will be deleted else if it doesn't no error message is printed simillar to
rm: cannot remove `': No such file or directory
-f option to suppresses these messages. It's useful when u write scripts to delete files silently and automatically at a specific time.

Note:
-v option is used with most of the commands (rm, cp...) it prints a msg about what it had performed.

login
To login as root/super user

sudo su
To login as any other user

login